Difference between revisions of "Lecture 1. - Assignment"
(→Knowledge needed to solve the problem) |
(→Steps to solve the problem) |
||
| Line 31: | Line 31: | ||
* Knowledge of the basics of [http://www.femm.info/wiki/HomePage FEMM] and [http://www.agros2d.org/ Agros2D]. | * Knowledge of the basics of [http://www.femm.info/wiki/HomePage FEMM] and [http://www.agros2d.org/ Agros2D]. | ||
| − | |||
| − | |||
</blockquote> | </blockquote> | ||
| + | |||
== Creating Geometry == | == Creating Geometry == | ||
<blockquote> | <blockquote> | ||
Revision as of 15:15, 3 April 2021
|
Fuel Injection Solenoid | |
|
|
|
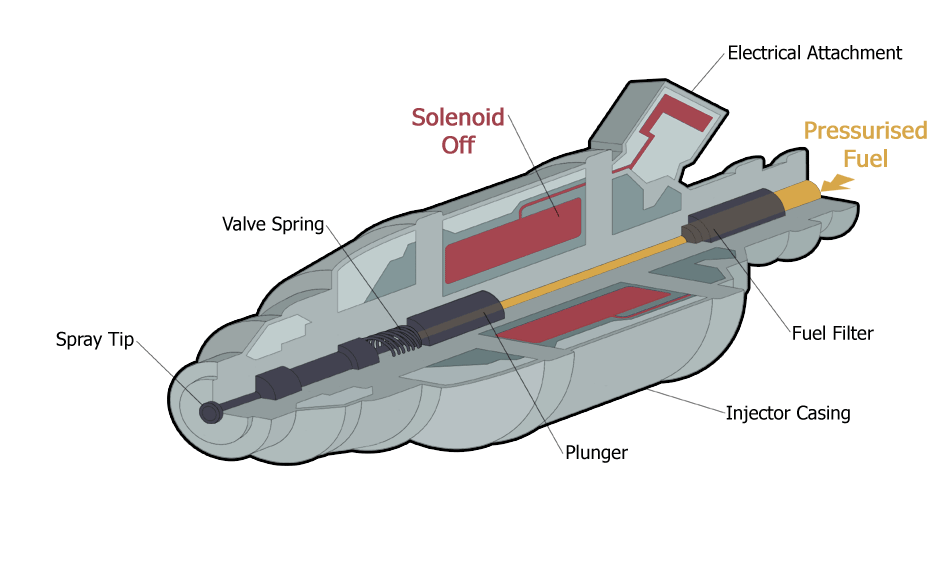
| The fuel injection in operation. [1] | The magnetic flux density vectors in the plunger after switch on the solenoid. |
|
Instructor
|
Teaching Assistants:
|


Contents
Purpose of the Assignment
The student will learn the main steps of the finite element method, such as creating the model (creating or importing geometry), specifying material parameters, boundary conditions, and excitation through simulation of the electromagnetic part of the fuel injector.
Knowledge needed to solve the problem
Creating Geometry
The geometry of the problem can be made in SpaceClaim, but also create another CAD software (AutoCAD; SolidWorks; Solid Edge; Catia; Creo; ...). The geometry consists of three parts, the iron core (plunger), the coil, and the cross-section of the coil for excitation.
The height of the cylindrical core is 14mm and the radii is 3.6mm. Dimensions of the coil: height is 20mm, inner radii is 4mm and outer radii is 10mm.
Creating Geometry in SpaceClaim
To use SpaceClaim properly, the Help menu and videos on YouTube are a great help. Here I will only detail the creation of coil cross section. The presentation and the related practice will present the complete workflow.
First, we create a plain in the cross-section of the coil core using the Design - Plane button. Then, in the Structure window, we add a New Component by clicking on Design Component. In the properties of the new component, set Shared Topology to Share and we drag and drop the coil into the new component. Then, as the next step, draw the cross section of the coil using the cross-section plane of the arrangement. If you have drawn the cross-section of the coil, it should also be in the tree of the new component. Because of the last step, the ANSYS Discovery AIM will treat the drawn surface as a cross-section of the coil, so this surface will use for excitation. Finally, right mouse button (RMB) clicking on Design Component, and click on Active Component to make the entire geometry active, not just the newly created component. Also, it is possible to parameterize the dimensions of the geometry and their relative position, such as taking into account the movement of the iron core.
If we created the geometry, save it, close SpaceClaim and start ANSYS Discovery AIM, and then select 'Electromagnetics'. Afterwards, Discovery AIM guides us through the complete simulation, so all the steps of the simulation are not detailed.
After importing the geometry, the task type is Electromagnetic, the source is Applied current and DC. The thermal behaviour of the task is Constant temperature and select 'Compute force' and 'Compute inductance' as an option. Finally, select 'Create surround automatically'. This option is important if the dimensions or position will change during the simulation.

Defining the Materials, Excitation
We can define the materials by selecting the volumes.
The coil is made of copper (Copper), the core is steel 1008 (Steel1008). If you want to modify some of their properties (conductivity, curve B-H), you can do it later in the properties of the materials.
To define the excitation, the cross-section of the coil should be selected with a drawn surface, then the current (0.2A) and the number of turns (2000) should be specified. Here you can also define the fill factor for the coil.
After that, we do not take care of discretization and the settings of the solver. The basic settings will be appropriate. Adaptive meshing uses in the solution, so we do not deal with the discretization for this problem.
Evaluation of Results
Here you can plot the field quantities (magnetic flux density, magnetic vector potential, etc.) and checked the value of the inductance of the coil and the acting force on the iron core. The following values were obtained for these quantities, the arrangement according to the cross-sectional view being 0 mm position.
The results of the simulation for validation. Software Maxwell 2D Maxwell 3D FEMM Agros2D Inductance [[math]\text{mH}[/math]] 51.911 51.812 51.821 51.89 Force [[math]\mu\text{N}[/math]] 88.603 63.29 74.53 57.45 In addition, it is possible to parameterize the geometry or most of the simulation parameters (position, size, current, number, ...) via script (FEMM - LUA script, Agro2D - Python). The result of a parameterized simulation is shown in the figure where the parameter is the position of the iron core. As a result, the modification of the parameter and the evaluation of results are automatic.
